Easy Ombré Nail Art with Rachel Messick
Get ready for some seriously simple ombré and aura nail art. The time has arrived, and I am SO excited to introduce you to our Soft Fade Gradient Palettes. Think of this like a pinterest recipe- go on the journey with me or scroll to the bottom for the abbreviated version.
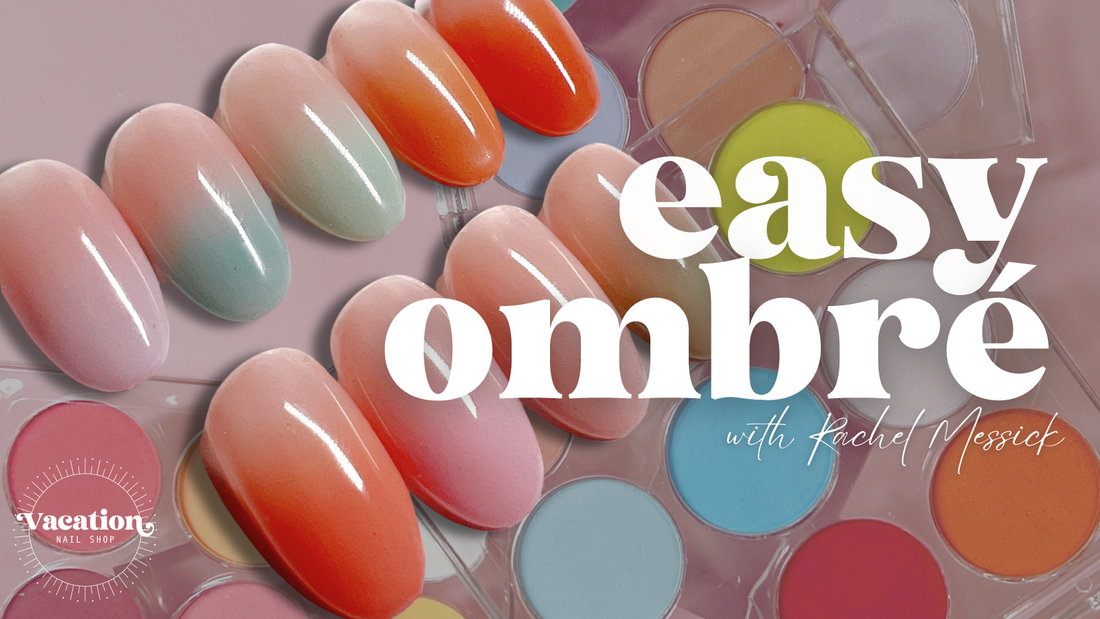
Our Soft Fade Gradient Palettes are available in three color ways:


Golden Hour: A medley of warm yellows, oranges, pinks and of couse that classic baby boomer white.


Retro Dream: My personal favorite, but, no pressure. A wild-card mix of punchy bights (hello Chartreuse!) and soft pastels that create a perfect 60s inspired color palette.


Sea Glass: Inspired by a weekend at the beach, our Sea Glass Palette is a collection of earthy clay tones and cool-toned blues, purples and sage.
Let's talk application...
For this walkthrough we’re going to assume you’ve already prepped your nail, applied your base gel and that your nails are painted the desired base color and that any-and-all finish filing is completed.
Personally, I love to use a base like the Nail Thoughts Tinted Bases (I’m wearing Peach in the video, but Milky, Hazelnut Creamerand Strawberry Milk are also client faves) because it makes my life easier and eliminates the step of having to add an extra layer of color.

Pressed pigments grip best on a velvety matte surface, so you’ll want to add a thin and even layer of matte top gel and cure to the maufacturer’s directions. Once it's cured, wipe thoroughly with alcohol and a lint-free wipe and allow to dry completely.

I love using a sponge applicator to start when working with pressed pigments, it enables you to really work the powder into the matte surface. A firm pressure will give you more opacity and a lighter touch will give you the flexibility you need to blend. Just keep adding color until you achieve the intensity desired. A small, densely bristled brush can be used to add additional softness to the blend, however we do not recommend using only a brush for application (it just doesn’t stick as well). If you would like you use a brush, use a sponge for intensity and placement, and then do a final blend with a a brush. Play with the techniques and see what speaks to you. We’ve just found that a little pressure and a sponge application has yielded the most optimal results.
Use the color of the pigment pan in the palette as a guideline for what the color will look like once it’s sealed in. Like all matte finishes- it’ll look brighter and chalky but it’s going to deepen when you seal it in with a glossy finish.

Once the effect is to your liking, lightly file the free edge of the nail to remove the powder just from the tip and gently wipe away the debris or loose powder from the nail and add a thin and even layer of base gel (pick one with good adhesion, and cure to manufacturer’s instructions.

IMPORTANT: once the base gel is added, do NOT file the nails any further- we’re sandwiching powder between two layers of gel, we want to make sure that the gel layers can connect with each other and bond and we don’t want to break that bond.

If you want to do more art, go for it. Either way, you are ready to add your top gel and cure to the manufacturer’s instructions.

The TL;DR:
- After you’ve prepped and added your base gel and desired gel color, add a matte top gel and cure.
- Wipe nail with alcohol and let it evaporate completely.
- Using a sponge applicator, press and rub the pressed pigment onto the matte nail surface.
- Gently file the powder off the free edge of the nail and wipe away any debris.
- Base gel and cure.
- Top gel and cure.